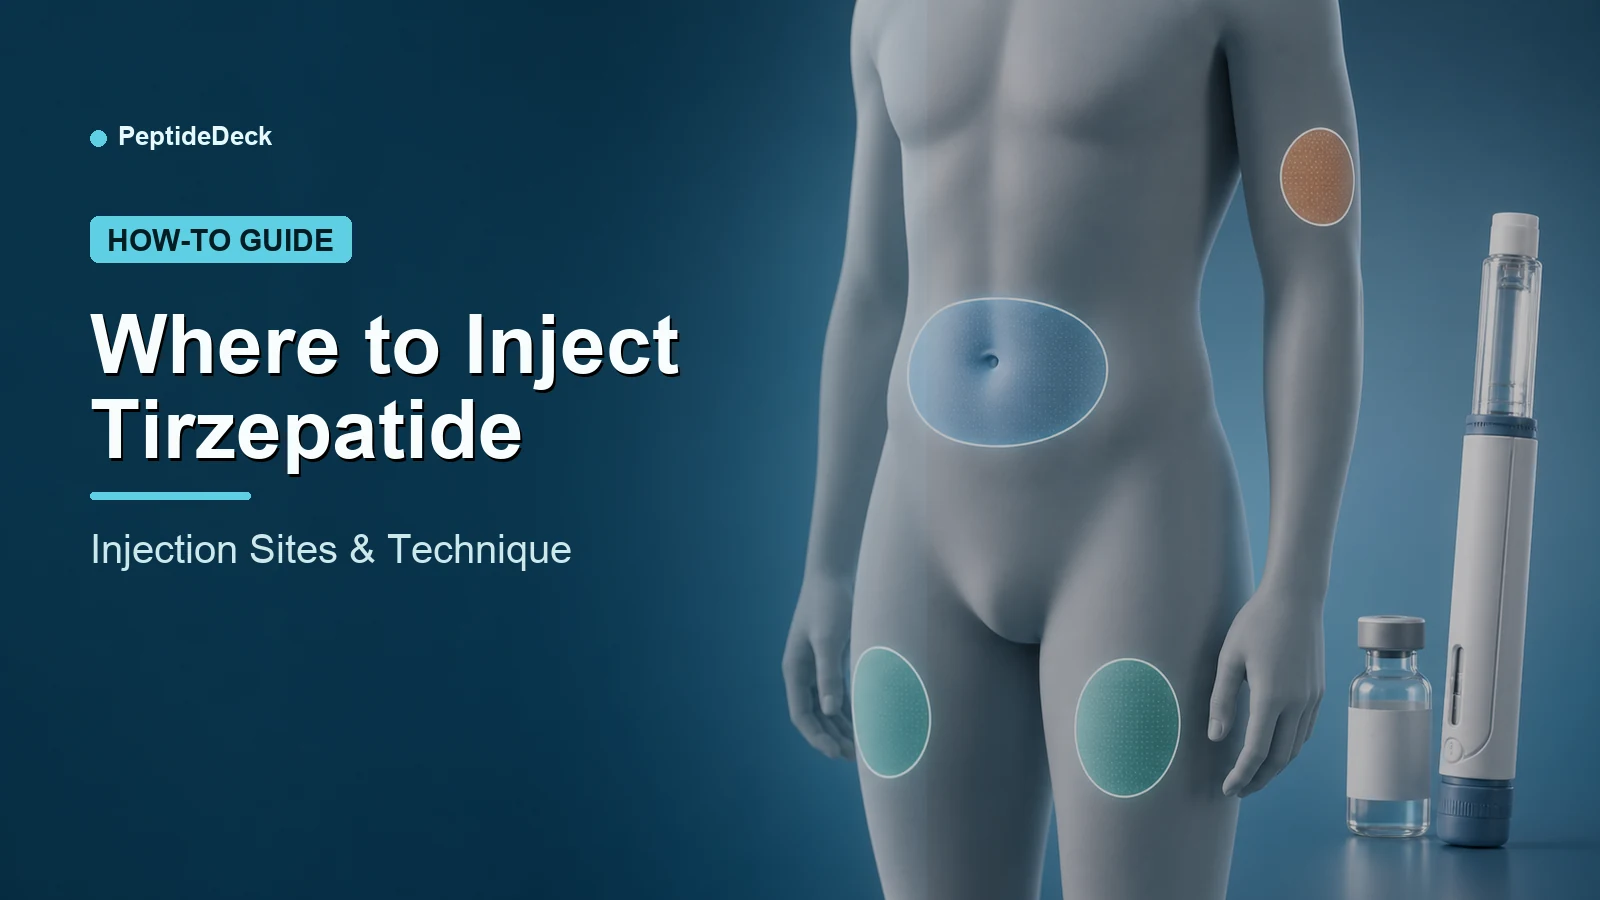

Three subcutaneous spots, that is it. Where to inject tirzepatide comes down to the abdomen, the front or outer thigh, and the back of the upper arm. Below you get the exact safe zone for each, a full draw-up-from-the-vial walkthrough including the 2.5 mg starting dose, and a weekly rotation plan that keeps lumps away.
Quick Answer
Inject tirzepatide into the fat just under your skin at one of three sites: the abdomen (stay at least 2 inches from your navel), the front or outer thigh, or the back of the upper arm. Pinch the skin, insert a 29 to 31 gauge insulin-syringe needle at a 90 degree angle, push the dose slowly over 5 to 10 seconds, and move to a fresh spot at least 1 inch away every week. The abdomen is the easiest area to reach and tends to absorb the most consistently, which is why most people start there.
🔑 Key Takeaways
- Three sites only: abdomen, front or outer thigh, and the back of the upper arm, all injected into subcutaneous fat, never into muscle.
- Mind the no-go zones: stay 2 inches from the navel, and avoid scars, bruises, broken skin, the waistband, and within 2 inches of the knee or groin.
- Rotate every week: shift the exact spot at least 1 inch each time and wait at least 4 weeks before reusing the same patch to prevent fatty lumps.
- Vial route, measured by units: draw your exact dose on a U-100 insulin syringe, clear the air bubbles, pinch, go in at 90 degrees, and hold for 10 seconds.
- Site does not change results: where you inject barely affects how well tirzepatide works, but good rotation protects absorption over time.
Where to inject tirzepatide: the 3 sites at a glance
Three body areas are approved. Tirzepatide is given as a subcutaneous injection, meaning it goes into the soft layer of fat just under the skin and above the muscle. That fat layer slows absorption to a steady drip, which fits the roughly 5-day half-life and once-weekly schedule of tirzepatide. The single-dose Mounjaro and Zepbound pens and a compounded vial drawn with a syringe all target the same three zones.
| Site | Exact safe zone | Best for |
|---|---|---|
| Abdomen (stomach) | At least 2 inches out from the navel in any direction, below the ribs, above the waistband | Easiest to self-inject, most consistent absorption |
| Front or outer thigh | Middle third of the thigh, avoid within 2 inches of the knee and 2 inches of the groin | Easy to reach while seated |
| Back of upper arm | The fatty area on the back of the arm, between shoulder and elbow | Usually needs a helper or a mirror |
Abdomen: the easiest spot to start
The belly is the default for a reason. It carries the most accessible subcutaneous fat, so you can pinch a clean fold and reach it without twisting. Use the area across your stomach but keep a 2-inch (about 5 cm) circle around the navel completely off limits, because the tissue right at the navel is denser and absorbs unevenly.
Picture the abdomen as four panels around that central no-go circle: upper left, upper right, lower left, lower right. Each panel is a separate target, which already gives you four rotation spots before you ever move to the thigh or arm. Stay below the ribcage and above the waistband, and skip any spot where a belt or seam digs in, since pressure there can irritate a fresh injection.
Front or outer thigh: easy while seated
The thigh is the next-best option. Sit down, and the front or outer thigh becomes a wide, stable surface you can see and pinch with one hand. Aim for the middle third of the thigh, roughly a hand-width below the hip and a hand-width above the knee.
Keep two buffers in mind. Avoid the skin within 2 inches of the knee and within 2 inches of the groin, where the fat layer thins out and the needle is more likely to reach muscle. Leaner legs may need the pinch-up technique or a 45 degree angle, covered below, so the dose stays in fat rather than muscle.
Back of the upper arm: usually a two-person job
The arm works, with a catch. The back of the upper arm holds a useful fat pad, but you cannot easily pinch and inject the same arm yourself. Most people either ask another person to do it or press the back of the arm against a wall or countertop to push the fat forward.
If you are self-injecting and live alone, the abdomen and thigh are simply more practical week to week. Keep the arm in your rotation when you have help, since adding it spreads the workload across more skin and lowers the odds of overusing any single area.
Where NOT to inject tirzepatide
Some skin is always off limits. Choosing a clean site is half of a painless, well-absorbed injection. Skip any of the following:
- The 2-inch circle around your navel.
- Scars, stretch marks, and tattoos, and stay at least 2 inches from any surgical scar.
- Bruises, tender spots, lumps, moles, or broken or irritated skin.
- The waistband line, where clothing rubs the site.
- Muscle. Tirzepatide is meant for fat, not deep tissue, so never aim for a firm, muscular area.
- Any spot that is red, hot, swollen, or hard from a previous shot.
How to inject tirzepatide from a vial with a syringe
The vial route is the gap most guides skip. Branded pens set the dose for you, but a compounded vial from a compounding pharmacy means you measure and draw the dose yourself on an insulin syringe. Done carefully, it is straightforward. Here is the full sequence.
- Wash your hands and gather supplies: the vial, a fresh 29 to 31 gauge U-100 insulin syringe, two alcohol swabs, gauze or cotton, and a sharps container.
- Bring the medication to room temperature. Let the vial sit out for 15 to 30 minutes. Room-temperature liquid stings far less than cold liquid straight from the fridge.
- Inspect the liquid. It should be clear and colorless with no floating particles. Do not use it if it looks cloudy or discolored, and check the expiration date.
- Wipe the rubber stopper with a fresh alcohol swab and let it air dry for a few seconds.
- Pull air into the syringe equal to the dose volume you are about to draw. This air replaces the fluid you remove and prevents a vacuum.
- Insert the needle through the center of the stopper and push the air into the vial.
- Invert the vial with the syringe still attached, and slowly pull the plunger to your exact unit mark.
- Clear the air bubbles. Tap the barrel so bubbles rise to the top, push them back into the vial, then re-draw to your precise dose. Air bubbles steal medication, so this step protects your dose accuracy.
- Withdraw the needle and set the syringe down without touching the needle to anything.
- Clean your chosen site with the second alcohol swab and let it dry fully, since wet alcohol is what makes a shot sting.
- Pinch a 1 to 2 inch fold of skin, insert the needle at 90 degrees, and push the plunger slowly over 5 to 10 seconds.
- Hold the needle in place for about 10 seconds before withdrawing, which prevents the dose from leaking back out.
- Release the pinch, press gauze on the site for about 30 seconds without rubbing, and drop the syringe straight into your sharps container.
If your compounded volume is larger than about 0.5 mL, inject a little more slowly so the tissue has time to accept the fluid and you avoid leakback.
Injecting the 2.5 mg starting dose from a vial
Start at 2.5 mg for four weeks. That first dose is the standard initiation dose used to let your body adjust, and it is not meant to control blood sugar on its own. On a vial, 2.5 mg is not a number you can eyeball, so you convert milligrams into units on a U-100 syringe, where 100 units equals 1 mL.
The unit mark you draw depends entirely on how your vial was reconstituted. The math is units = (dose in mg divided by concentration in mg/mL) times 100. Get the concentration right with our reconstitution math and cross-check the volume against the tirzepatide dosage chart. Common results for a 2.5 mg dose:
| Vial concentration | Volume for 2.5 mg | Units on a U-100 syringe |
|---|---|---|
| 5 mg/mL | 0.50 mL | 50 units |
| 10 mg/mL | 0.25 mL | 25 units |
| 20 mg/mL | 0.125 mL | 12.5 units |
Confirm your vial's exact concentration before you draw. Drawing 25 units when your concentration is actually 5 mg/mL would double your intended dose, so the reconstitution number is the one figure you cannot guess.
Pen vs vial: how the technique differs
The site is identical. The handling is not. If you use a Mounjaro or Zepbound pen, the dose is sealed inside a single-use pen and the needle is hidden, so most of the steps below are handled for you. The vial route adds the measuring and air-bubble steps.
| Step | Branded pen | Vial + insulin syringe |
|---|---|---|
| Dose setting | Pre-filled, one fixed dose | You draw the exact units yourself |
| Needle | Hidden and pre-attached | You use the insulin-syringe needle |
| Air bubbles | Not your concern | You must tap them out before injecting |
| Injecting | Press the base against skin, hold for the click | Pinch, insert at 90 degrees, hold 10 seconds |
| Skill needed | Minimal | Moderate, accuracy matters |
Needle gauge, angle, and the pinch-up technique
Three details decide comfort. For a vial, a 29 to 31 gauge, 1/2 to 5/8 inch needle on a 1 mL insulin syringe is standard. A 30 gauge half-inch needle is the usual sweet spot, thin enough to be nearly painless and long enough to reach fat reliably.
Angle follows your body. Most people inject at a 90 degree angle straight into a pinched fold. If you are very lean and worried the needle could reach muscle, pinch firmly and drop to a 45 degree angle instead. The pinch-up itself matters: gripping a 1 to 2 inch fold of skin lifts the fat away from the muscle and creates a clean target, which is the single best move for an easy injection.
Injection site rotation and a weekly plan
Never reuse the same dot. Injecting into the same exact spot week after week can cause lipohypertrophy, firm fatty lumps where the tissue thickens. Those lumps do more than look or feel odd: they absorb medication erratically, so an over-used spot can quietly blunt your dose. To spot one, run your fingers over old sites and feel for any raised, rubbery, or numb patch, then stop using it until it softens.
The fix is simple rotation. Each week, move the exact spot at least 1 inch from the last one, and wait at least 4 weeks before returning to any patch of skin. A repeatable schedule removes the guesswork:
| Week | Site |
|---|---|
| Week 1 | Lower-left abdomen |
| Week 2 | Lower-right abdomen |
| Week 3 | Left front thigh |
| Week 4 | Right front thigh |
| Week 5 | Upper-left abdomen (back of left arm if you have help) |
| Week 6 | Upper-right abdomen (back of right arm if you have help) |
After week 6, start over, nudging each spot about an inch from where it landed last cycle. Picking a consistent injection day and logging the site in your phone makes the rotation automatic.
Does where you inject change how well it works?
For practical purposes, no. Once-weekly tirzepatide is designed so the long, roughly 5-day half-life smooths out absorption regardless of which approved site you pick. You may notice the abdomen feels the most reliable, but the difference in real-world results between the abdomen, thigh, and arm is minor. What does affect absorption is poor rotation: scarred or lumpy tissue takes up the dose unevenly, which is the real reason to spread your shots around.
Managing pain, bruising, lumps, and leaking
Minor reactions are common. Mild redness, itching, or a small bump at the site usually shows up soon after the shot and fades within a few days. Knowing what is normal keeps you from panicking over a routine pinprick. Here is how to handle the usual issues, with more detail in our tirzepatide side effects overview.
- Pain or stinging: let the alcohol dry first, use room-temperature medication, and insert the needle in one quick motion.
- Bruising: usually from nicking a tiny vessel. Apply gentle pressure, do not rub, and rotate away from the bruise next time.
- Lumps or nodules: a firm bump can be lipohypertrophy from reusing a spot. Stop injecting there, rotate widely, and it generally softens over several weeks.
- Leaking (leakback): a drop escaping after the needle comes out. Hold the needle in place for 10 seconds before withdrawing, then press with gauze.
- Redness and itching: mild irritation is normal and self-resolves. Do not scratch.
Call a provider if redness spreads beyond 2 inches, the site feels hot to the touch, or you run a fever, since those can signal an infection rather than a normal reaction.
Tips to make the injection nearly painless
Small habits add up. Most people are surprised how little a well-done shot hurts. Stack these:
- Always use a fresh, sharp needle. Reused needles dull and drag.
- Let the medication reach room temperature before injecting.
- Wait for the alcohol to dry completely.
- Relax the muscle under the site instead of tensing it.
- Insert the needle quickly, like a dart, rather than slowly pressing in.
- A 30 gauge half-inch needle is thin enough that many people barely feel it.
Sharps disposal, storage, and a missed dose
Finish every shot the same way. Drop the used syringe or pen straight into an FDA-cleared sharps container, never into household trash or recycling, and follow your state's take-back rules when the container is full. Keep unopened vials and pens refrigerated, and follow your specific product label for how long the medication may sit at room temperature once it is out of the fridge.
For timing, tirzepatide is once weekly. If you miss a dose, take it as soon as you can if fewer than 4 days have passed; if more than 4 days have gone by, skip it and resume your normal schedule, and never take two doses within 3 days of each other. To change your injection day, make sure at least 3 days separate the old dose and the new one, and review the full schedule in our tirzepatide dosing guide. New to all of this and still sorting out access? Our walkthrough on how to get tirzepatide covers the legal routes.
Frequently Asked Questions
References
- U.S. Food and Drug Administration. Mounjaro (tirzepatide) Prescribing Information. accessdata.fda.gov.
- Eli Lilly and Company. Mounjaro Instructions for Use. uspl.lilly.com.
- Eli Lilly and Company. Zepbound Instructions for Use. uspl.lilly.com.
- MedlinePlus. Tirzepatide Injection. U.S. National Library of Medicine. medlineplus.gov.
- MedlinePlus. Subcutaneous (SQ) injections. U.S. National Library of Medicine. medlineplus.gov.
- U.S. Food and Drug Administration. Best Way to Get Rid of Used Needles and Other Sharps. fda.gov.
- Gentile S, et al. Lipohypertrophy and injection site rotation. PMC, National Library of Medicine. ncbi.nlm.nih.gov.